|
|   |
|
| |

The Security Maintenance enables you to have a of a comprehensive security management on your system which include:
Please note: This program should have the highest security level, and should only be available for management use.
Any changes to the Security will not be applied until Autosoft 5 is closed down and restarted.
Security System Setup
The system administrator may configure a virtually unlimited number of security groups, each with specific access rights. This will essentially determine what a user will be able to access and see within the Autosoft 5 Program.
Limiting access to business sensitive information is critical to a business, but limiting security can also create a very manageable environment for a user requiring only a few of the many available modules in Autosoft to perform their day-to-day tasks. So whilst Autosoft may seem to be highly sophisticated, overloaded with features and options that could seem overwhelming for a low-end user, it can be tailored to have only those options relevant appear and hence make the software appear far less complicated and far more manageable. This feature alone can measurably improve productivity as staff are not spending time looking through unnecessary menu-options to find what hey are looking for.
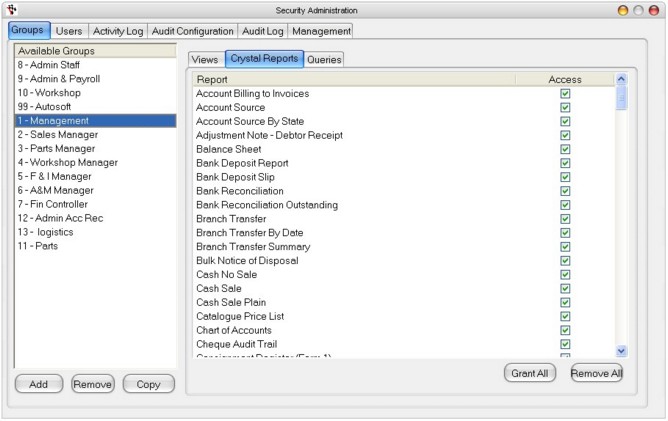
Groups Tab
The first step to setting up security groups is to plan what groups will be required and what levels of access each should have. When doing this, it should be noted that each user can belong to multiple security groups and will inherit the highest level of security across those groups for each configurable option. As such, there is generally no need to overlap access rights across multiple groups. Just setup each group with rights specific to the type of work functionality required. Then make each user a member of only those groups that describe his/her job.
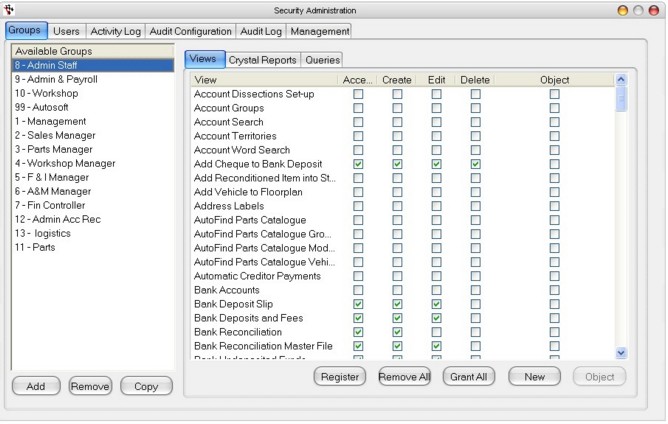
Available Groups - Groups set up by default on your system
Note: You can add additional group according to your personal preference.
To Add a new security group:
On the bottom left hand side click on the Add button, then type new Group name and click OK.
Buttons:
Add - Click this when adding a new group name
Remove - To remove existing group
Process on deleting a new security group:
Select a Group on the left hand pane. Then click on the Remove button on the bottom left hand side.
You will then be prompted with a warning message.
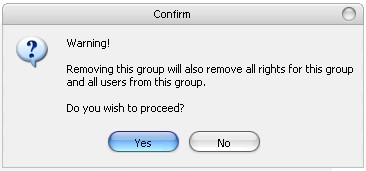
Click the Yes button to delete group and all users from the group.
Click the No button to cancel the deletion
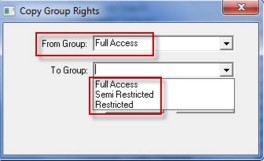
Copy - You can use this feature if you want to copy group rights from one group to another.
Views Sub-Tab
To grant access to a group, click on the Group and then on the Views tab tick the appropriate access rights.

Access - Grants access to view, search and browse but cannot add or edit any records. You cannot invoice with this Access only.
Create - Grants access to create new records, but once created cannot edit records.
Edit - Grants access to edit records only.
Delete - Grants access to delete records only.
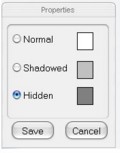
Object - When you tick object, the program view will appear and a properties box.
Properties
-Click on an object in the program view and then click on the properties.
Click on the Save button to save the setting.
Normal - Object can been seen.
Shadowed - Object can be seen but can not be edited as it is shadowed out.
Hidden - Object can not be seen and is hidden.
Example:
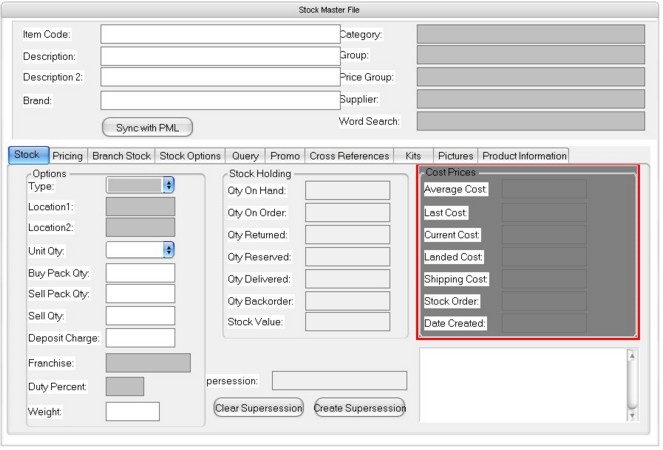
In the example above the Light-grey areas would be able to be seen but not changed in the Stock Master File: Category, Group, Price Group, Supplier (All critical in the pricing and reporting of parts) also Type, Location1, Location2, Franchise and Duty Percent.
All the Cost information would be hidden. The resultant Stock Master File would look like the diagram below:
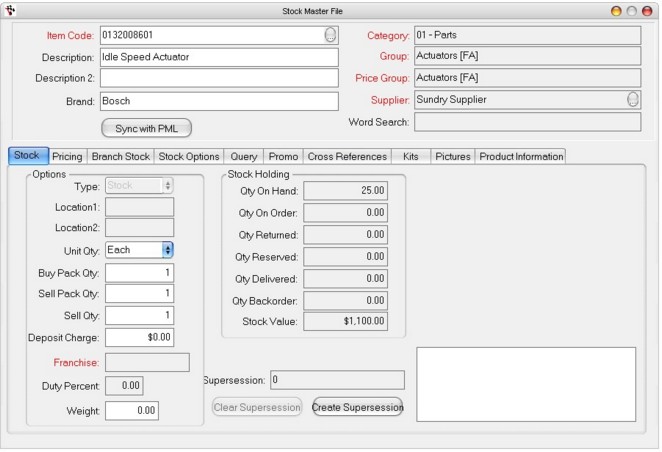
Here, the Category, price, group/price group and supplier are all able to be seen but cannot be clicked on. The entire Cost information column is gone, the Type drop-down box option is greyed out signifying it cannot be changed.
Security maintenance can therefore be incrementally applied throughout the sysem this way to protect your valuable business information from inadvertant change.
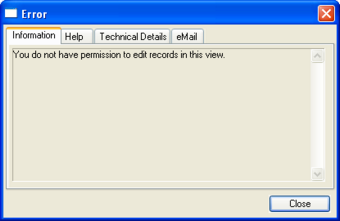
If the user or group does not have access the following error message will occur.
Buttons
Register - Registers any new components or security options not yet listed that may be the result of an update to your software version for example.
Remove All - Removes Access, Create, Edit and Delete for all views.
Grant All - Grants Access, Create, Edit and Delete for all views.
New - Adds in new view options, this feature will be active in future releases, for now it will not change any settings
Object - For a line that has the Object box ticked, this will open up the object modifier options.
Crystal Reports Sub-Tab
All Autosoft 5 reports are generated using crystal reports. To grant access to a report, click on the Group and then on the Crystal Reports tab tick Access
.
Buttons
Grant All - Grants access to all crystal reports.
Remove All - Removes access to all crystal reports.
Queries Sub-Tab
Access to Queries are set in the Queries tab. To grant access to a Query, click on the Group and then on the Queries tab tick Access.
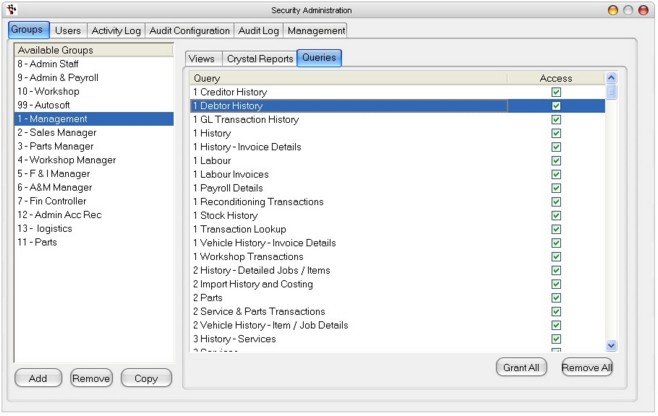
Buttons
Grant All - Grants access to all crystal reports.
Remove All - Removes access to all crystal reports.
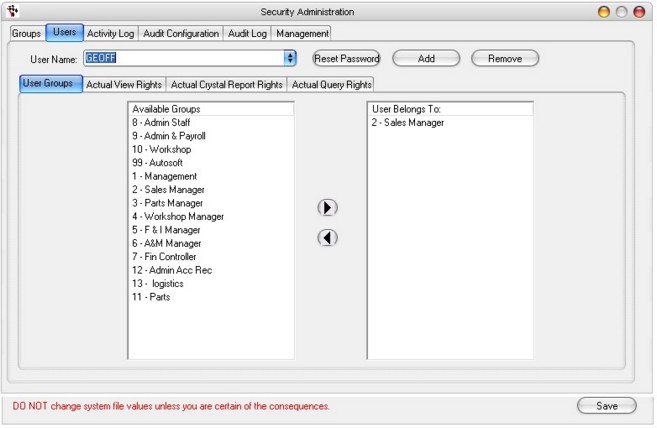
Users Tab
In the Users tab each user may be issued a unique login name and belong to one or more security groups.
User Name - Name of user set up on the system
Buttons
Reset Password - Option to reset the user name's password
Resetting Passwords
To reset a password, select the user by clicking the drop down list beside User Name.
Click on the ![]() Reset Password button to reset the password for a user back to the user name.
Reset Password button to reset the password for a user back to the user name.
The user can then log into Autosoft 5 and change a password to any other value.
Add - Click to add a new user name
Adding a new Users
To add a new user, click on the ![]() Add button type new username and click OK.
Add button type new username and click OK.
When first created, the password for a user matches the user name.
Remove - Click to remove a user name
Deleting Users
To delete a new user, select the user by clicking the drop down list beside User Name.
Click on the ![]() Remove button and click Yes to confirm the deletion
Remove button and click Yes to confirm the deletion
User Groups Sub-Tab
Available Groups - List of User Groups available in your Autosoft system
User Belongs To - Specific Group where the user belongs to
Process in adding a new User to a Group
- The new user must belong to a Group
- Select the user by clicking the drop down list beside User Name.
-Select the Group you want the user to belong to in the available groups box
-Click on the right arrow ![]() in the middle of the screen.
in the middle of the screen.
-This will then put the group in the user belongs to box.
Note: A user can belong to more than one group, however, the highest individual access rights for each group will be used.
Process to remove a user from a group:
-Select the user
-Highlight the Group in the right-hand column
-Click the left arrrow ![]() to remove that group from the available list.
to remove that group from the available list.
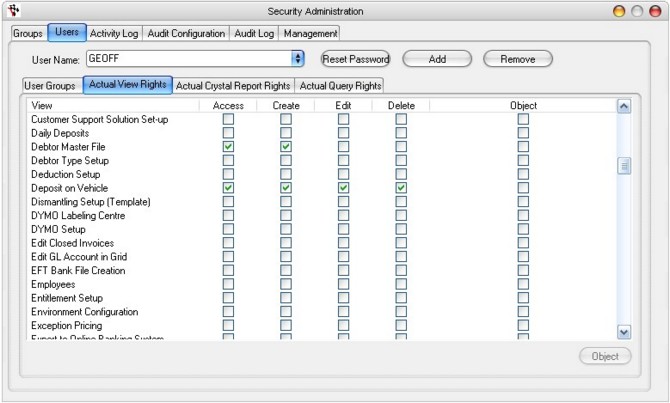
Actual View Rights Sub-Tab
Tabbing to the Actual Rights tab within the Users tab displays the actual view level rights for that user based on all of the security groups of which the user is a member.
You cannot change the rights on this view.
.
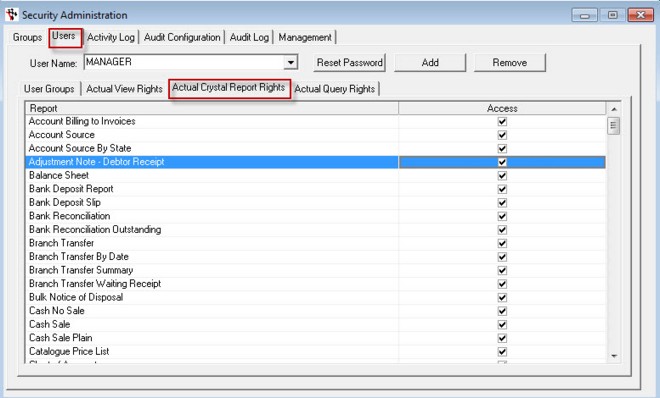
Actual Crystal Report Rights
Tabbing to the Actual Crystal Report Rights within the Users tab displays the actual crystal level rights for that user based on all of the security groups of which the user is a member.
You cannot change the rights on this view.
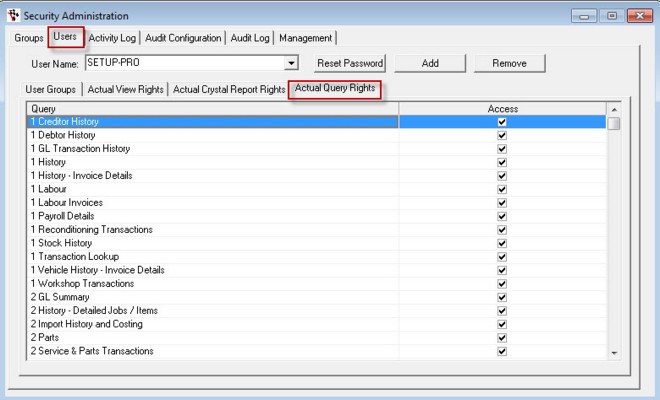
Actual Query Rights
Tabbing to the Actual Query Rights within the Users tab displays the actual query level rights for that user based on all of the security groups of which the user is a member.
You cannot change the rights on this view.
Activity Log Tab
The activities for users are logged in this area of the program.
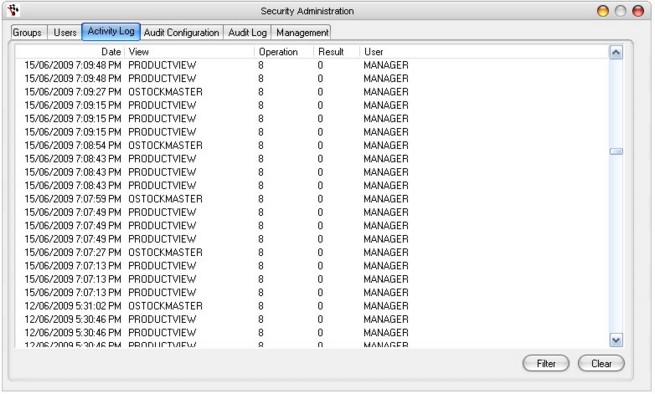
Buttons
Filter - Click to filter entries for specific user
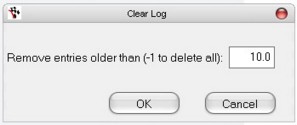
Clear - There is the ability of the system to clear the log (this log can contribute to database size bloating after a long period of time). You can clear the activities for a period of days and older, or clear all records by entering -1 days.
Handy function to see which user login is performing what task, and to monitor every action performed through the software.
Audit Configuration Tab
The Audit Configuration tab is where a system administrator may configure which types of events will be logged as well as view events that have occurred.
Simply click on those events that are to be logged and uncheck those that are to be ignored in the Audited check boxes.
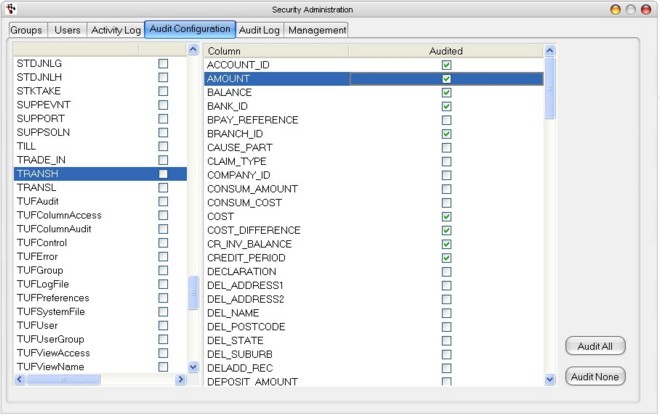
Left Column - Audit Config file to be audited
Middle Column - Individual fields that can be audited. This populates the column when clicking a specific file on the left column
Audited Column - Allows you to select individual field to be audited by clicking it.
Process:
To audit all fields for a file, select the file in the tree from the Audit Config tab and click on the Audit All Fields button i.e. Product (Stock File).
To audit individual fields from a file, select the appropriate field and double click. It is possible to add and remove fields from the audit trail even once the system has been running for a considerable time period. However, it should be noted that only those fields that are currently selected for auditing are logged when a transaction occurs.
Buttons
Audit All - Click to edit all file
Audit None - Click when no file needs to be audited
Audit Log
The Audit Log shows each individual record update that has occurred, for files and fields that have been configured for auditing.

Log ID - Each line in the audit trail also has a Transaction ID. This ID is used to group multiple record updates across one or more files that form a single database transaction. For example, when an order line item is created, this might also result in the updating of an order header and a customer. Each of these updates will share a common transaction ID. The record that started the transaction, will be marked as the originating record. As with the event log, the transaction audit log can be filtered to show records matching a specific set of criteria.
Table - The file updated.
View - The view in which the transaction was generated.
User - The person who generated the transaction.
Type - Type of transaction (create a new record, edit an existing record or delete an existing record)
Date - The time and date that the transaction occurred.
Col # - Column Number
Column - Individual files audited
Before - Before values
After - After values
Top Section - shows transactions on a record by record basis.
Bottom Section shows the fields that were audited with before and after values.
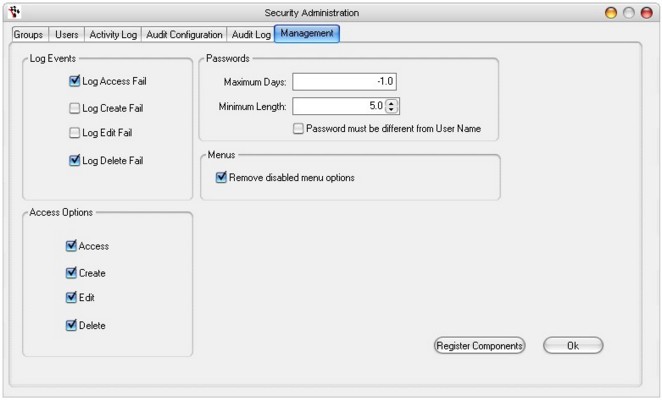
Management Tab
The Management tab has options for the configuration of logging, passwords and menus. Register Components will force options missing from the security list to appear if they have been amended in an update or otherwise.
|
What are you trying to do? |
Video/Knowledge base Guide |
|
Create a new user (and restrict them to a Branch if necessary) |
|
|
Know how to block a specific part of an invoice using security. |
|
|
Learn how reset User Passwords |
|
|
how to create a new user (person who needs to login and use Autosoft) and restrict them to only accessing 1 Branch. |