|
|   |
|
| |
Debtor Receipts represent payments made by Debtors (customers). They are used for debtors that have account terms (ie not cash-accounts) and will allow payments to be made with reference to specific invoices. Debtor Receipts have a convenient short-cut, which is Ctrl+2
Header Area
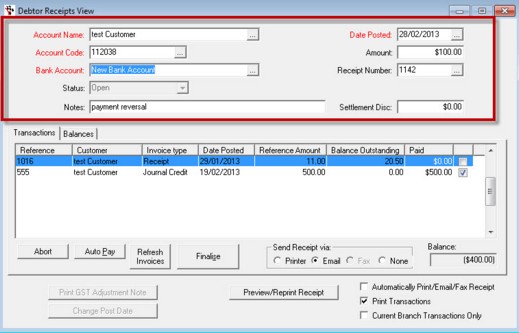
Account Name - Search for the debtor name.
Account Code - Debtor code will show once a name is chosen.
Bank Account - Select a bank account that this receipt will go into for banking purposes.
Status - The status shows if the receipt is open or closed. If you are viewing a Finalised Debtor Receipt the Status will be closed and you can not make any changes to it other than the Change Post Date.
Notes - Add comments for this payment i.e. Ref inv 2345 24/1/2002.
Date Posted - The date of when the receipt is processed, usually the current date.
Amount - Enter the amount being paid.
Receipt Number - If processing a new debtor receipt leave blank and press Tab to go to the next field. To recall a debtor receipt that has been processed (closed) or an open (saved) receipt, enter receipt number or press F4 for a list of transactions for a particular debtor. The closed receipt can only be viewed, the open receipt can be processed further. To save a receipt for further processing press F2.
Settlement Discount - Enter the amount (if any) for settlement discount. When processing a debtor receipt with settlement discount given, you will need to send your Debtor an adjustment note for GST purposes.
i.e. The debtor owes $100 and receives a 2% discount for paying in 30 days, the debtor pays $98.
In the amount field $98 is entered and $2 in the settlement discount field. $100 is deducted from the debtors account and $2 is added to the Settlement Discount Given, General Ledger account. The total amount $98 is entered into Amount Paid.
NOTE: You must complete all the receipt details and then tab to the transactions reference field for the program to populate the outstanding transactions. Otherwise no transactions will appear.
Transactions Tab
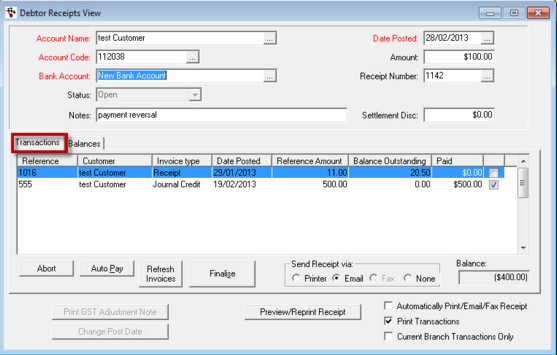
Reference - Invoice Reference Number
Customer - Name of customer
Invoice Type -This shows the type of transaction
Date Posted - Date the invoice was posted
Reference Amount - Amount that was invoiced
Balance Outstanding - Remaining balance that needs to be paid
Paid - This section is where the receipts are allocated.
Tick Box - If the debtor is Open Item each invoice can be paid by ticking the box next to the amount. If the payments are consecutive invoices the AutoPay button can be used, invoices will be paid from the oldest up to the value of the receipt. The last invoice may be only partly paid if the receipt does not match the whole amount of the invoice.
If the receipt is balance forward the payment will automatically go to the oldest period with values in it. If the amount is less than the receipt it will add values in the next periods until all of the receipt is allocated. If this is the correct period click finalise to process the receipt, if this is not the correct period enter 0 (zero) and it will take you to the next period.
When all amounts are allocated and balance with the original amount the receipt can be processed. The Finalise button will be highlighted, click the button to process and the debtor receipt will be updated.
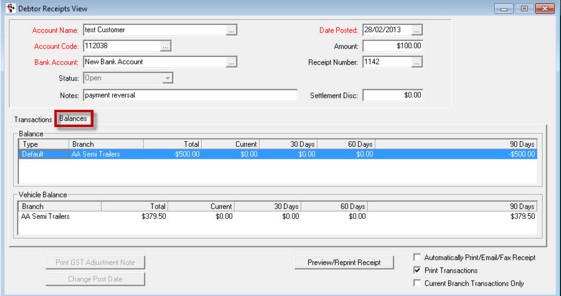
Balances Tab
This shows the customers current owing balance at your branch and any other branches if applicable.
It will also show the Vehicle Balance for dealerships - this is the unpaid amounts owed on a Vehicle Purchase.
Buttons
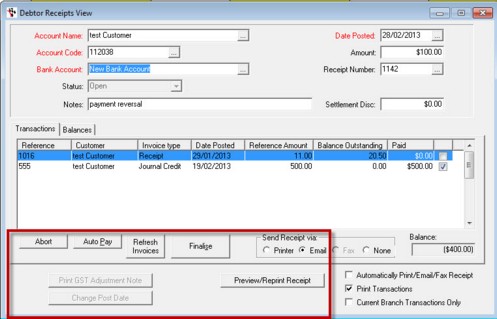
Abort - To cancel the entire transaction click on abort.
AutoPay - This button allows you to allocate the Amount you have entered to autopay to the oldest transactions.
Refresh invoices - checks for new invoices that have been recently finalised but are not yet appearing on the list of payments to be receipt.
Finalise - Once the total amount of the receipt is allocated, click on the Finalise button and the Receipt Payment box will appear to enter the payment method.
If you do not allocate the total amount typed in the Amount field, the system will ask you if you want to "Allocate over payment to this account". Click on the Yes button to process an over payment.
Print GST Adjustment Note - At the bottom of the debtor receipt screen, click on the Print GST Adjustment Note button and click the printer icon. Reprints can also be made by searching for the original debtor receipts in Date Posted and reprint by following the above procedure.
Change Post Date - If you want to modify the date the invoice was posted
Preview/ Reprint Receipt - If a receipt is required, click this button to preview the receipt and then print if required by clicking on the printer icon.
Tick Boxes
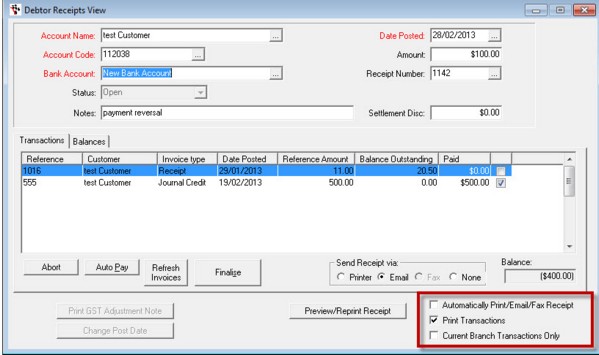
Automatically Print Receipt - Tick this box to automatically print a receipt after each entry.
Print Transactions - If you opt to print transactions
Current Branch Transactions Only (For multiple branch systems only)- Tick this box if you only want to see transaction for the branch you are logged in as.
Receipt Payment box - this allows you to choose client's form of payment
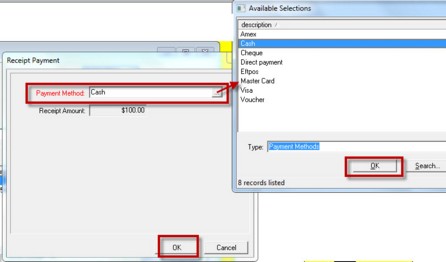
Payment Method - Once the receipt is finalised the Receipt Payment box appears. This box has all of your payment types. Choose the type of payment i.e. Cheque, Eftpos, MasterCard, etc. Payment types are setup in the Payment Methods program in the Parts Invoicing Menu.
Receipt Amount - Amount of money for collection
If the payment type is cheque, type the cheque number in the cheque number field and Tab. If the bank details are in the Debtor Master File they will show. If the bank details are not there add them. Once added they will be transferred to the Debtor Master File. To complete the transaction click OK. The Bank Deposit Slip will now have the amount and cheque details ready for banking. If the cheque number is NOT entered the cheque will NOT appear in the Bank Deposit Slip.
Note: If Settlement Discount was given the amount of the cheque is transferred to the Bank Deposit Slip not the total amount paid off the debtors account. Check the debtors cheque details each time - their cheque account may change.
Receipt Options and Balance Section
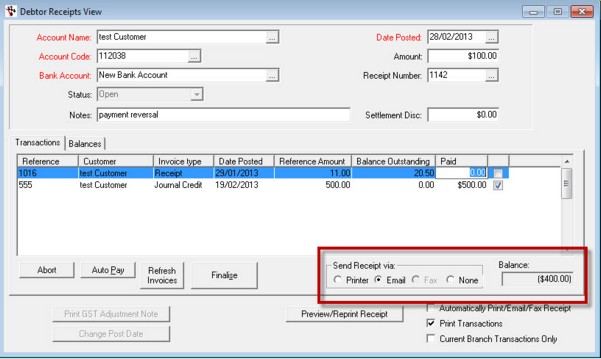
Send Receipt Via - Options on how you would like to send your Client's Debtor Receipt
Balance - Remaining amount that the debtor needs to pay after debtor receipt has been processed
Debtor Receipts Till Selection
In the System File, General Setup tab, the option ‘Using Multiple Tills’ must be enabled.
When a user opens the Account > Debtors > Receipts program and selects a Debtor to apply a receipt to, they will be presented with a Till Selection screen which can be used to select which till will be updated with the amount of money being received.
The screen capture below shows the Till Selection screen.
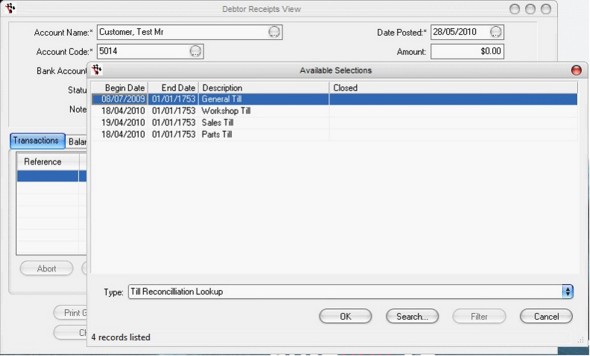
The user can select a Till from a list of available open tills. Once the Till has been selected the user can process the debtor receipt normally.
**Reallocate receipt - for when a debtor receipt amount is put to the incorrect receipt - Currently this functionality is undergoing amendment and has been locked for versions from late 2011 to early 2012. Once the functionality has been re-designed it may be re-activated again**
|
What are you trying to do? |
Video/Knowledge base Guide |
|
How to Use the Auto-pay Option in Debtor Receipts |
http://service.autosoft.com.au/entries/21365782-How-to-use-the-Autopay-option-in-Debtor-Reciepts |
|
Do a Debtors Run- Balances and Payments of Debtor Customer Accounts |
|
|
Make Debtor Receipt Payment for Outstanding Invoices at Another Branch |
|
|
Reverse a Debtor Receipt Payment |
http://service.autosoft.com.au/entries/21603635-How-to-Reverse-a-Debtor-Receipt-Payment |
|
Watch Videos about Debtor Accounts, Setup and Maintenance |
Go to your Client Portal Login - Training Lessons - Accounting Series |