|
|   |
|
| |

Job Codes are used to define standard workshop operations. It is also useful in defining sublet jobs and charge jobs at a fixed price or by mechanic hours. It is essential in adding parts to jobs. Defining jobs saves you time when creating repair orders.
The Job Code Maintenance screen allows you to define standard jobs that your workshop will perform on a regular basis.

Important: Job codes form the basis of many of the operations in the workshop module. The time that you spend setting up your job codes will be more than re-paid in time and effort saved when creating and then invoicing workshop jobs.
Job codes allow you to define the type of job that you will be doing, e.g. general service, brake pad change or perhaps a radiator flush. You can also assign a retail price to the job, specify mechanic hours and list any parts or consumables that would be used in this type of job.
You can also assign a standard set of comments to the job which can print on the customers RO and invoice.
Job codes are designed to save you time, by entering most of the information you need to type automatically. You can setup the most common jobs that the workshop does on a regular basis and then attach those jobs to vehicles that come into the workshop.
Header Area
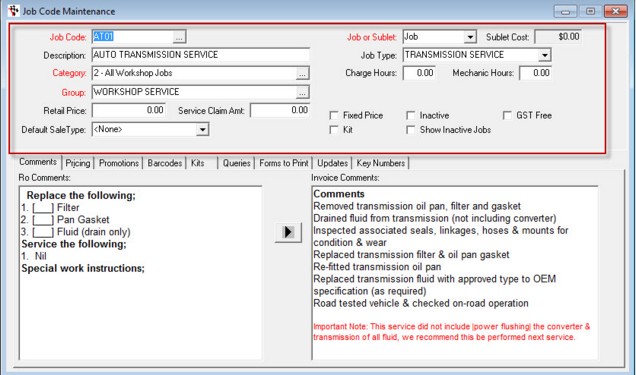
Job Code -is a unique identifier for that job. Before you create any job codes it’s a good idea to have a layout of how you will structure the codes.The code given to a job can be any combination of letters and numbers.
Description - This is a basic description of what the job is. It is used when searching for jobs so you can easily see what each job is for.
Category & Group - You can Categorize and Group your Labour for Reporting and GL Mapping functionality in the same way you can with Parts. See the Product Categories and Group section for more information.
Retail Price - If you want to set a Price for this particular Job, put in a price and tick ‘Fixed Price’ box. If left blank it will charge at the default Workshop Sale Type Labour rate you have set.
Service Claim Amount - Cost of service
Default Sale Type - You can choose among the options of sale types as set on Workshop -Sale Types on your Autosoft system. Leave as <None> if you have default sale types set to debtors.
Job or Sublet - The ‘Job or Sublet’ field allows you to define the job code as either a job that will be performed in your workshop, or as a sublet repair that will be performed by another entity (discussed in ‘Sublet Cost’, below).
Job Type - The Job Type field allows you to define some additional information about the job and its default follow up service dates - see Vehicle Job Type Setup for further information.
There is a default 'VEHICLE SERVICE'
Charge Hours - The charge hours is the amount of mechanics time you wish to allocate to the job for charge out purposes. If you fill in this field, for example with 1.5 hours, when adding the job to a workshop repair order, 1.5 hours of mechanics time will be charged to the customer (the mechanics hourly rate can be varied based on the sale type of the customer, discussed further in this document).
Mechanic Hours - Mechanic hours is the amount of actual time that you would expect a mechanic to complete the job in. This field is used for mechanic efficiency analysis. It can be compared to both charge hours and actual hours it takes the mechanic to complete the job.
Sublet Cost - When a job code is setup as a ‘Sublet Repair’ you are able to enter a sublet cost price for the job.
Important: A ‘Sublet Repair’ job cannot have mechanic hours associated with it. It is a fixed price by default and does not need the ‘Fixed Price’ box checked. It also cannot have any additional parts associated with it as a kit (kits are discussed below).
Job Code Options
There are five selection boxes in the top right corner of the Job Code Maintenance Screen:

Fixed Price -This has been discussed above in the ‘Retail Price’ section. It allows a set invoice price to be allocated to a job regardless of mechanic hours/charge out rates.
Kit- This selection box indicates that the job has one or more parts associated with it which will be added to the repair order with the job (kits are discussed in more detail below).
Inactive - This selection box will make the job inactive - it will no longer be seen when adding jobs to a repair order. If a job code is not being used at the present time but may be used again in the future it can be made inactive rather than being deleted.
Show Inactive Jobs - This selection box applies to all job codes, not just the current one. By default an inactive job will not be available to select when searching existing jobs.
GST Free - When no GST is needed
Comments Tab
By default, the comments tab is displayed on all job codes
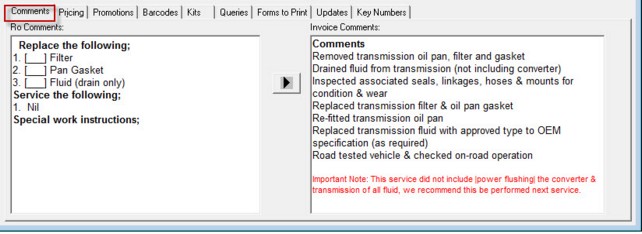
Ro Comments - You can enter in text here that will display on the repair order when printed. Typically repair orders are internal documents so the comments here should detail the tasks of the job for the mechanic.
Invoice Comments - Text entered here will print on the customers invoice. The information should reflect to the customer the work that has been done on their vehicle for this job.
Arrow Button - The Arrow button will copy any text in ‘Ro Comments’ across to ‘Invoice Comments’. This is a quick way of filling in both fields, fill out the ‘RO Comments’, copy them over to
Invoice Comments’ and modify as required.
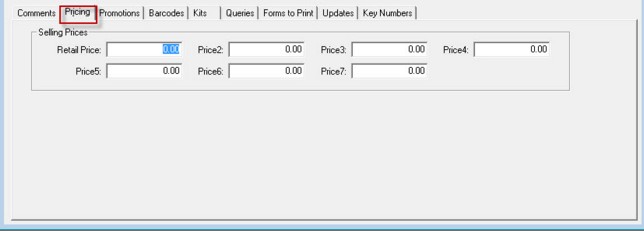
Pricing tab
Shows the item's price as set on the stock master file.
Promotions Tab
A promotion is a way of changing the invoice price of a job when that job meets the date criteria of the promotion. It could be used to discount a particular vehicle service/check, for example a safety check leading up to Easter or Christmas when many people travel. See the Promotion Setup for more information.
Important:
Promotions will apply only to jobs that are setup with a ‘Retail Price’ and have the ‘Fixed Price’ selection box ticked. Promotion discounts will not apply to jobs that are charged using ‘Charge Hours’ even if the promotion setup as a percentage discount.
Also the promotion discount will only apply to the job code price, any additional parts added to the repair order as part of a kit will not be discounted (read about kits further on in this document).
Barcodes Tab
Where you can add the barcode and notes as well

Kits Tab
It is possible to associate specific parts with a workshop job code. Parts that are added to a job code are then part of a ‘kit’.
Adding parts to a job code can be useful, it can save the operator time as they do not have to search for the parts to add to the job and it can also reduce errors by ensuring that all the correct parts are added and none are forgotten or incorrect ones selected.
The job code however does need to be specific enough so that the parts that are added are relevant to that vehicle.

Item Code - Codes of the item included on the kit
Description - item's description
Qty - Quantity of items added to the kit.
Consider the following example:

The above job code (105) has a description of ‘ VS Minor Service’. It has 2 hours of Mechanic Charge Hours attached to it and also has the ‘Kit’ selection box ticked.
Under the ‘Kits’ tab we can see the following parts attached:
FF109 Fuel Filter Qty: 1
D7A Spark Plugs Qty: 6
1253118 Air Filter Qty: 1
Z9 Filter Qty: 1
When a repair order is created, if we select job code 105 the above parts will automatically be added to the repair order, along with the job:

Important: The job code in the example above has parts that are relevant to a specific vehicle, in this case a VS Commodore. Autosoft will allow the operator to attach this job to ANY repair order regardless of whether or not the repair order belongs to a VS Commodore.
If using kits in Autosoft it is recommended that you create ‘kit’ job codes for the most common types of jobs that the workshop will perform and also have generic job codes that can be used (e.g. ‘6cyl Minor Service’) for vehicles that won’t fit within a ‘kit’ job code.
Queries Tab
The Queries will give you some information about particular job codes.

Job Code History - This will display a summary of repair orders that have been invoiced to the customer that have this job code attached. Vehicle details, list and cost prices can be viewed.
List All Jobs - Provides the list of all jobs listed on this particular job code
Monthly Quantity Invoiced - This will display a monthly summary of invoices created with this job code. It will show the number and dollar amount of jobs invoiced. It will also show any credits against the job code and give prior month and year detail.
Unallocated Sublet Repairs - This query will show detail only for jobs that are of ‘Sublet Repair’ type. It will give detail of any sublet repair job that has been created that has not yet been linked to a creditors invoice. It would be used in reconciling where a creditors invoice needs to be allocated to.
Any of the above queries can be printed, exported as a CSV file or saved to disk.
Forms to Print Tab

Trigger - Choose among the options to print job card or finalise invoice
Document to Print - Look for the document that you want to print here
Updates Tab
This is where you need to go if you want to update job code price in your kit.
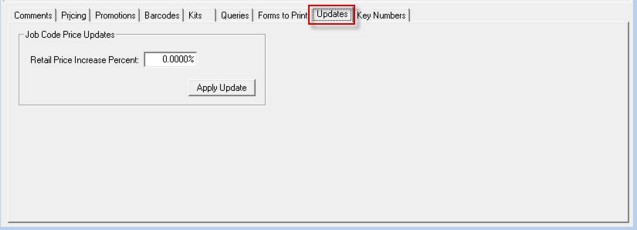
Retail Price Increase Percent - Specify how much cost (in percentage) will you want to increase.
Apply update - Button you need to click to apply changes
Key Numbers Tab
Allows access to the internet within your Autosoft software

|
What are you trying to do? |
Video/Knowledge base Guide |
|
Creating Job Codes in Autosoft |
http://service.autosoft.com.au/entries/21652730-How-to-Create-More-Job-Codes-in-Autosoft |
|
Accessing Job Codes Kit creature feature through Invoice Repair Order |
|
|
Knowing about kit creation |
http://service.autosoft.com.au/entries/21415145-How-to-Create-a-Kit-in-Autosoft- |
|
Processing a sublet to a job |
|
|
Watch video to learn more |
Go to your Client Portal Login �- Quick Start Training - Workshop Basics� |